En este tutorial vamos a realizar un divertido proyecto. El proyecto se trata de unos Goggles con NeoPixel, esto es ideal para que lo utilices en tus disfraces y te veas como un verdadero Geek.
Los Goggles que vamos a realizar son como los que se muestran en el siguiente video:
[nextpage title = «Materiales»]
Ensambla tus propios Goggles.
Los materiales que vamos a utilizar para este proyecto son los siguientes, usted puede cambiar o agregar algunos si así lo desea, pero estos son los más basicos:
![]()
Gemma v2 o Trinket
Googles Adafruit. Ver aquí.
2 NeoPixel Ring de 12 o 16 Leds
Bateria LiPo Nano 3.7V a 260mA
Conector JST
Micro Switch
Cables UTP
Pistola con silicon caliente
Cinta de aislar
Cautín y soldadura
[nextpage title = «Cableado»]
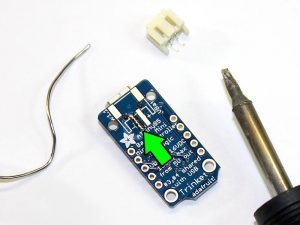
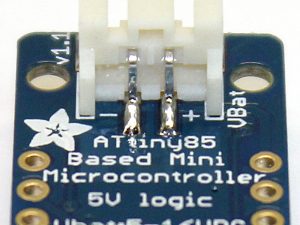
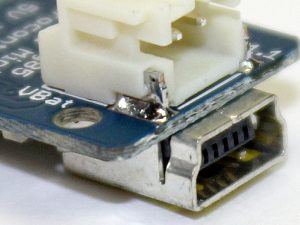
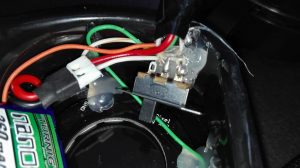
Lo primero que debemos de hacer es soldar el conector JST a la tarjeta Trinket para que podamos conectar la batería LiPo como se muestra en la imagen, si estás utilizando la Gemma v2 no hace falta soldar algún conector porque ésta ya viene con el conector integrado.
Una vez que ya soldamos el conector JST a la Trinket procedemos a realizar el siguiente cableado como se muestra en el diagrama:
![]()
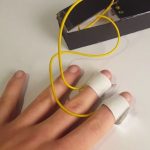
Soldamos cada uno de los cables tomando en cuenta la distancia así como la posición de los componentes en los Goggles. Al final el resultado será algo como lo que se muestra en la imagen:
![]()
[nextpage title = «Código»]
Lo primero que se debe de hacer antes de cargar el código es configurar su IDE de Arduino, para eso tenemos un tutorial en el siguiente enlace:
CONFIGURACION DEL IDE ARDUINO
Una vez configurado el IDE de Arduino copie y pegue el siguiente código en un sketch nuevo:
#include <Adafruit_NeoPixel.h>
#define PIN 1
// Parameter 1 = number of pixels in strip
// Parameter 2 = Arduino pin number (most are valid)
// Parameter 3 = pixel type flags, add together as needed:
// NEO_KHZ800 800 KHz bitstream (most NeoPixel products w/WS2812 LEDs)
// NEO_KHZ400 400 KHz (classic 'v1' (not v2) FLORA pixels, WS2811 drivers)
// NEO_GRB Pixels are wired for GRB bitstream (most NeoPixel products)
// NEO_RGB Pixels are wired for RGB bitstream (v1 FLORA pixels, not v2)
// NEO_RGBW Pixels are wired for RGBW bitstream (NeoPixel RGBW products)
Adafruit_NeoPixel strip = Adafruit_NeoPixel(24, PIN, NEO_GRB + NEO_KHZ800);
// IMPORTANT: To reduce NeoPixel burnout risk, add 1000 uF capacitor across
// pixel power leads, add 300 - 500 Ohm resistor on first pixel's data input
// and minimize distance between Arduino and first pixel. Avoid connecting
// on a live circuit...if you must, connect GND first.
void setup() {
strip.begin();
strip.show(); // Initialize all pixels to 'off'
}
void loop() {
// Some example procedures showing how to display to the pixels:
colorWipe(strip.Color(255, 0, 0), 50); // Red
colorWipe(strip.Color(0, 255, 0), 50); // Green
colorWipe(strip.Color(0, 0, 255), 50); // Blue
//colorWipe(strip.Color(0, 0, 0, 255), 50); // White RGBW
// Send a theater pixel chase in...
theaterChase(strip.Color(127, 127, 127), 50); // White
theaterChase(strip.Color(127, 0, 0), 50); // Red
theaterChase(strip.Color(0, 0, 127), 50); // Blue
rainbow(20);
rainbowCycle(20);
theaterChaseRainbow(50);
}
// Fill the dots one after the other with a color
void colorWipe(uint32_t c, uint8_t wait) {
for(uint16_t i=0; i<strip.numPixels(); i++) {
strip.setPixelColor(i, c);
strip.show();
delay(wait);
}
}
void rainbow(uint8_t wait) {
uint16_t i, j;
for(j=0; j<256; j++) {
for(i=0; i<strip.numPixels(); i++) {
strip.setPixelColor(i, Wheel((i+j) & 255));
}
strip.show();
delay(wait);
}
}
// Slightly different, this makes the rainbow equally distributed throughout
void rainbowCycle(uint8_t wait) {
uint16_t i, j;
for(j=0; j<256*5; j++) { // 5 cycles of all colors on wheel
for(i=0; i< strip.numPixels(); i++) {
strip.setPixelColor(i, Wheel(((i * 256 / strip.numPixels()) + j) & 255));
}
strip.show();
delay(wait);
}
}
//Theatre-style crawling lights.
void theaterChase(uint32_t c, uint8_t wait) {
for (int j=0; j<10; j++) { //do 10 cycles of chasing
for (int q=0; q < 3; q++) {
for (uint16_t i=0; i < strip.numPixels(); i=i+3) {
strip.setPixelColor(i+q, c); //turn every third pixel on
}
strip.show();
delay(wait);
for (uint16_t i=0; i < strip.numPixels(); i=i+3) {
strip.setPixelColor(i+q, 0); //turn every third pixel off
}
}
}
}
//Theatre-style crawling lights with rainbow effect
void theaterChaseRainbow(uint8_t wait) {
for (int j=0; j < 256; j++) { // cycle all 256 colors in the wheel
for (int q=0; q < 3; q++) {
for (uint16_t i=0; i < strip.numPixels(); i=i+3) {
strip.setPixelColor(i+q, Wheel( (i+j) % 255)); //turn every third pixel on
}
strip.show();
delay(wait);
for (uint16_t i=0; i < strip.numPixels(); i=i+3) {
strip.setPixelColor(i+q, 0); //turn every third pixel off
}
}
}
}
// Input a value 0 to 255 to get a color value.
// The colours are a transition r - g - b - back to r.
uint32_t Wheel(byte WheelPos) {
WheelPos = 255 - WheelPos;
if(WheelPos < 85) {
return strip.Color(255 - WheelPos * 3, 0, WheelPos * 3);
}
if(WheelPos < 170) {
WheelPos -= 85;
return strip.Color(0, WheelPos * 3, 255 - WheelPos * 3);
}
WheelPos -= 170;
return strip.Color(WheelPos * 3, 255 - WheelPos * 3, 0);
}
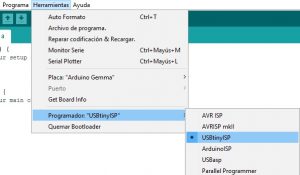
Una vez creado el código se conecta la tarjeta Gemma o Trinket, ir al menú Herramientas de su IDE Arduino y en Programador seleccione USBtinyISP.
Ya que hayas realizado todas estas configuraciones ahora sí ya puedes compilar y subir tu programa a la tarjeta, es importante saber que no importa si estás utilizando la tarjeta Trinket o Gemma, se hacen las mismas operaciones sin modificar nada.
Si tu código ha sido cargado correctamente los NeoPixel comenzarán a encender como se muestra en la imagen.![]()
[nextpage title = «Montaje final»]
Ahora lo único que resta hacer es pegar con silicon caliente u otro pegamento que consideres adecuado y no corrosivo, busca una forma adecuada de colocar los cables para que nuestros Goggles tengan una buena estética.
![]()
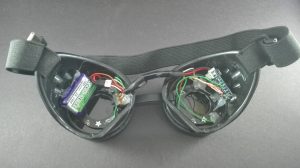
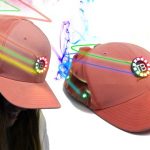
El resultado final será como lo que se muestra en la imagen:
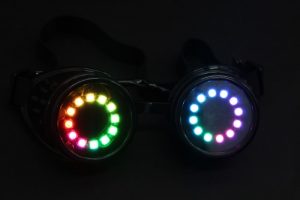
Disfruta tus Goggles Geeks y diviértete con tus amigos…